We’re delighted you’ve just received your sensor. Here are setup instructions for how to set it up, and what to do next.
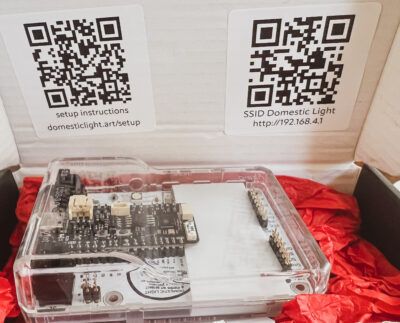
IN THE BOX / YOUR SENSOR ID
On the bottom of your box and on the bottom of the sensor is a 6 digit number. This is your sensor and site ID and how we keep track of what data goes where.I
There are also two QR codes – the “setup instructions” link to the latest version of these instructions, and the “SSID Domestic Light” QR code links to the sensor’s wifi configuration page (if you are connected to the Domestic Light wifi network).
SENSOR SETUP:
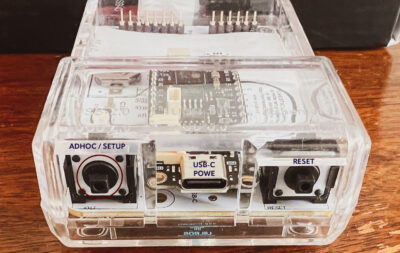
POWER: Plug the sensor into 5V USB power using a USB-C cable or a USB-B cable with adaptor. If you requested a cable or power adaptor, one should be in the box. Otherwise – any USB 2.0 or 3.0 power supply will work. It draws less than an amp. The sensor USB-C port is on the end with 2 buttons.
ENTER SETUP MODE: To enter your wifi network credentials, you need to put the sensor in “Setup” mode. It becomes into a wifi hotspot named “Domestic Light” you can access with your phone or computer.
- with the end of the sensor with buttons facing you, press and hold the left button “SETUP”,
- press and release the right button “RESET”
- wait a few seconds and release the SETUP button.
ENTER YOUR WIFI DETAILS: Go to your network settings on your computer or phone and look for the wifi network called “DOMESTIC LIGHT”. Join this network with your device. If you don’t try the setup mode again, and also turn your computer wifi on/off/
Once you joined the network enter the IP address http://192.168.4.1 in your browser (or point your camera at the “setup” QR code in the sensor box.
PLEASE BE SURE TO ENTER HTTP not Https as the sensors internal webserver for the setup process only works on http. It reverts to https once it goes online.
- A webpage called “Domestic Light” will open.
- Take note of the “UUID” or host ID on the page. This is same number on the bottom of the sensor and is a six digit number. This is the primary ID for your location for the project.
- Enter your Wifi SSID and password in the appropriate box.
- If you want to send sensor data to a computer on your local network using Open Sound Control (OSC) enter that information.
- Once done, click “SUBMIT”. The web page will save the information in storage on the sensor and shutdown the network.
- Press the right hand “RESET” button on the sensor. It should restart in normal data collection mode.
PICK A LOCATION AND CONFIRMING SETUP:
If the setup worked – the device should connect to your wifi network and begin sending data. You will see the blue LED light go on / off approx once every ten seconds.
LOCATION: Find a spot inside near a window (or a windowsill) that gets outdoor light for at least for a little bit of the day.
LET US KNOW: Once you’ve completed this process – please email ian and let us know that you have your sensor live, and let us know what direction it faces (or snap a picture). We will enable your sensor host page on the site.
ADVANCED USERS:
If you want to watch more diagnostic information (or see the raw data being sampled) you can connect the sensor to your computer using a USB cable and open a USB serial port monitor (such as the one in the Arduino IDE).
If you set up an OSC address to send data to you should see the data flow in your program.
To learn more including links to the project GitHub repository see our technical details page or this setup guide.
Thank you!